Manual Installation#
This section explains how to manually install liflib into an existing Python environment. If you get lifelib with WinPython from the download page, lifelib and all the relevant packages are pre-installed and pre-configured, so no need to follow the steps on this page.
Requirements#
lifelib is cross-platform, and supports Windows, Linux and Mac. This guide shows installation steps based on Windows, the steps are the same on other platforms, except that command prompt should be interpreted as terminal on Linux and Mac.
lifelib works with Python 3.6 or newer. However, Python 3.6 reached its end of life so if you’re still using Python 3.6, you should upgrade it. The newer the version of Python is, the faster it performs.
Microsoft Excel is not required. You would only need Excel or its alternatives if you want to edit input data files.
Install lifelib#
Anaconda environment
Anaconda is a bundle of Python, its major packages and IDEs including packages required or optionally used by lifelib, such as numpy, pandas, Spyder, and provides a Python environment out-of-the-box, just by installing it with few clicks.
If your Python environment is based on Anaconda,
you should use the conda command
to download lifelib from conda-forge and install it into the environment.
Go to Windows menu and start Anaconda Prompt inside Anaconda3 submenu to bring up a command prompt.
Then in the Anaconda Prompt, execute the following command:
> conda install -c conda-forge lifelib
The command above also installs modelx automatically, which lifelib depends on. You may also need to install openpyxl manually, if not installed yet. To check if it’s installed, type:
> conda list
and see if openpyxl is listed in the output. If not listed, type:
> conda install openpyxl
to install openpyxl. In case your environment is missing numpy or pandas by any chance, install them in the same way.
Non-Anaconda environment
lifelib is available on PyPI - the Python Package Index.
If your Python environment is not Anaconda, use pip command to download and install lifelib.
In the case of the custom WinPython downloaded from this site’s download page,
open WinPython Command Prompt. From the command prompt, type:
> pip install lifelib
The command above also installs modelx automatically, which lifelib depends on. You may also need to install openpyxl manually, if not installed yet. To check if it’s installed, type:
> pip list
and see if openpyxl is listed in the output. If not listed, type:
> pip install openpyxl
to install openpyxl. In case your environment is missing numpy or pandas by any chance, install them in the same way.
Note
(For advanced users) To install the latest development version instead of the released version, clone the lifelib repository and modelx repository on github, and install them from the cloned repos in editable mode.
Update lifelib#
Anaconda environment
In the case of an Anaconda environment, to update lifelib to the newest release, type from Anaconda prompt:
> conda update lifelib
Non-Anaconda environment
In the case of a non-Anaconda environment, including the WinPython from the download page,
to update your existing installation to the newest release, use -U option with pip:
> pip install -U lifelib
Install Spyder plugin for modelx#
Spyder is a popular open-source Python IDE, and it allows plugins to be installed to add extra features to itself. Spyder plugin for modelx enriches user interface to modelx in Spyder. The plugin adds custom IPython consoles and GUI widgets for using modelx in Spyder.
Anaconda environment
Spyder is bundled in with Anaconda by default. To install the plugin for modelx, type the following command in WinPython Command Prompt:
> conda install -c conda-forge spyder-modelx
The command above installs spyder-modelx and spymx-kernels. Both packages are required
for the plugin.
To launch Spyder, go to Windows menu, select Spyder inside Anaconda3 menu.
Non-Anaconda environment
Spyder plugin for modelx is available on PyPI as a separate Python package. To install the plugin into a non-Anaconda environment, type by the following command:
> pip install spyder-modelx
The command above installs spyder-modelx and spymx-kernels. Both packages are required for the plugin for modelx.
For more about Spyder plugin for modelx, refer to Spyder plugin page on modelx documentation site.
Note
lifelib models are built in the form of modelx objects. Refer to modelx documentation when you have questions about modelx as you proceed with this guide. To learn Python itself, there are many good tutorials out there on the web, such as the one on Python’s official web site.
Configure Spyder#
There are 2 Spyder settings that you want to consider changing from their default values. Note that you need to restart Spyder to bring your changes into effect.
Disable User Module Reloader
Reloading modelx module creates multiple instances of modelx systems within the same Python process, causing models created before and after a reload to reside in different modelx systems. To prevent this, you need to change User Module Reloader (UMR) setting.
From the Spyder menu, select Tools->Preferences to bring up Preferences window. Choose Python interpreter in the left pane, and you’ll find an area titled User Module Reloader (UMR) on the bottom right side of the Preferences window. Leave Enable UMR option checked, click Set UMR excluded(not reloaded) modules and then UMR dialog box pops up as the figure blow. Enter “modelx” in the dialog box. This prevents Spyder from reloading the modelx module every time you re-run the same script from Run menu, while allowing other modules to be reloaded.
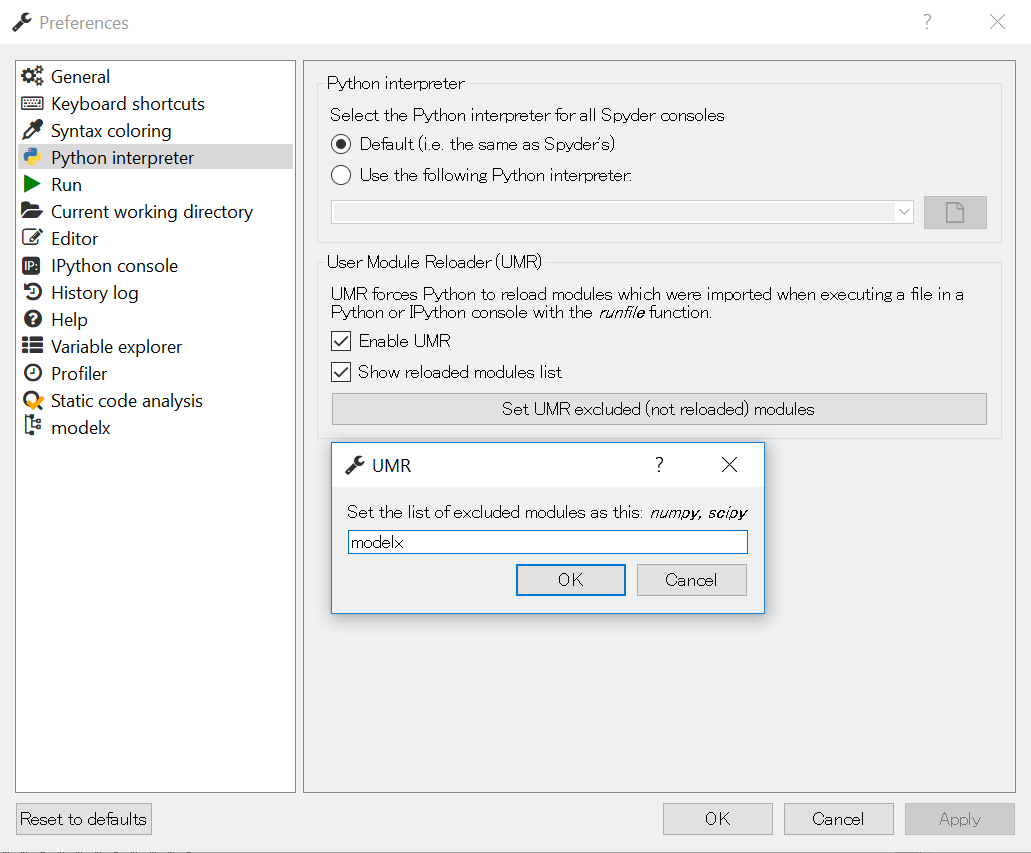
User Module Reloader setting#
Graphic Backend
By defult, Graphic Backend option is set to Inline. This option affects where graphs are placed, and how modelx GUI widgets behaves.
If Graphic Backend is set to Inline, graphs are embedded in the IPython console as an output. If it is set to Automatic, graphs are drawn in separate windows, which pop up upon calling plot methods on matplotlib objects.
If you’re fine with the default Inline mode, then no need to change anything. To change Graphic Backend option, go to Tools->Preferences, and on the left side of the Preferences window, select IPython console then Graphics tab on the right pane.
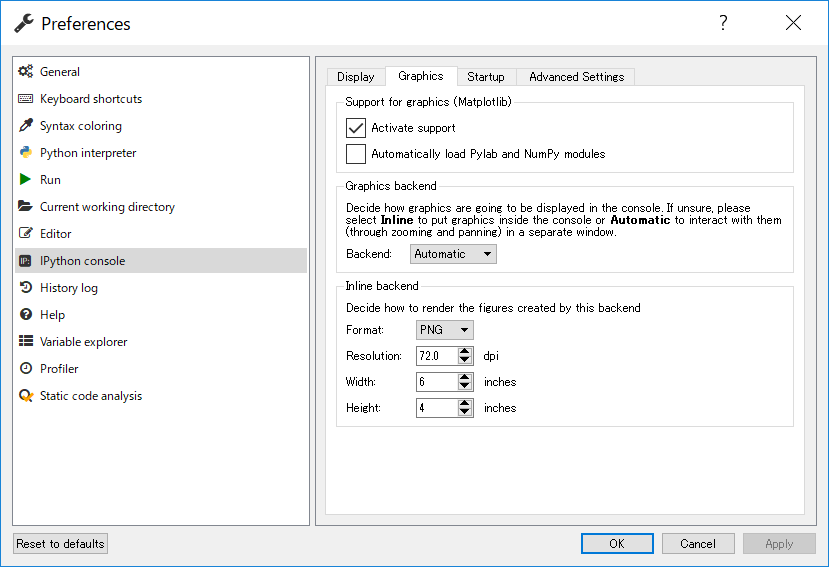
Graphics Backend setting#